Wednesday, July 17, 2013
Monday, June 24, 2013
The Logical Query Processing in T-SQL
Today I’m going to discuss about the Logical Query
Processing in T-SQL
Logical Query Processing: The conceptual interpretation of
the query that explain what the correct result of the query is
Physical Query Processing: Processing of the query by
database engine. Produce the result defined by logical query processing.
Following are the Main Query Clauses in the order that you
are supposed to type (known as “keyed-in-order”)
- SELECT
- FROM
- WHERE
- GROUP BY
- HAVING
- ORDER BY
But the Logical Query Processing order, which is the
Conceptual interpretation order, is different
- FROM
- WHERE
- GROUP BY
- HAVING
- SELECT
- ORDER BY
Because of this logical order you won’t get expected result for
below sample query,
SELECT Name , YEAR(Joindate) AS JoinDate
FROM dbo.Emplyees
WHERE JoinDate > 2000
This should be,
SELECT Name , YEAR(Joindate) AS JoinDate
FROM dbo.Emplyees
WHERE YEAR(Joindate) > 2000
Thursday, May 16, 2013
What is SQL Server Operating System ( SQLOS)
In the past, scalability was the major issue in SQL Server because
it supported only for small or medium sized workloads due to its engine
capabilities. With this issue Microsoft had to make massive changes to SQL
server to serve for the large workloads demands
The Key observation here is that DBMS and OS schedulers must
work together. Either OS must have built in support for DBMS or DBMS must have
a special scheduling layer.

If I summarized the SQLOS:
- Application Layer between SQL Server components and the OS
- Provides more refined control of resource allocation
- Centralizes resource allocation to provide more efficient management and accounting
- Abstracts the concepts of resource management from components such as the Query Engine & Query Optimizer
The SQLOS was created to centralize common low-level tasks
within the SQL Server process. Having a
central location for these tasks means less duplication of code within the
various components of the engine, but it also offers the flexibility to adjust
SQL Server to new and advanced hardware architectures without impacting the other
areas of SQL Server code.
The SQLOS behaves very much like an operating system. It abstracts the concept of memory
management, I/O, scheduling etc. from the other components within the SQL
engine. In this way, these components do
not need to worry about managing things like NUMA and Resource Governor, they
simply make resource allocation calls to the SQLOS via an API.
The SQL engine is still a process like any other process
running on a Windows server. It does not
have any special privileges or priority over other process. The SQLOS does not bypass Windows, it simply
manages the resources within the SQL Server process space in a way that is
efficient for SQL Server.
Sunday, May 5, 2013
Edgar Frank "Ted" Codd, Father of the Relational Database.
Rule (0): The system must qualify as relational,
as a database, and as a management system.
For a system to qualify as a relational database management
system (RDBMS), that system must use its relational facilities
(exclusively) to manage the database.
Rule 1: The information rule:
All information in a relational database (including table
and column names) is represented in only one way, namely as a value in a table.
Rule 2: The guaranteed access rule:
All data must be accessible. This rule is essentially a
restatement of the fundamental requirement for primary keys. It says that
every individual scalar value in the database must be logically addressable by
specifying the name of the containing table, the name of the containing
column and the primary key value of the containing row.
Rule 3: Systematic treatment of null values:
The DBMS must allow each field to remain null (or empty).
Specifically, it must support a representation of "missing information and
inapplicable information" that is systematic, distinct from all
regular values (for example, "distinct from zero or any other
number", in the case of numeric values), and independent of data
type. It is also implied that such representations must be manipulated by the
DBMS in a systematic way.
Rule 4: Active online catalog based
on the relational model:
The system must support an online, inline,
relational catalog that is accessible to authorized users by means of
their regular query language. That is, users must be able to access the
database's structure (catalog) using the same query language that they use to
access the database's data.
Rule 5: The comprehensive data
sublanguage rule:
The system must support at least one relational language
that
- Has
a linear syntax
- Can be
used both interactively and within application programs,
- Supports
data definition operations (including view definitions), data manipulation
operations (update as well as retrieval), security and integrity
constraints, and transaction management operations (begin, commit,
and rollback).
Rule 6: The view updating rule:
All views that are theoretically updatable must be updatable
by the system.
Rule 7: High-level insert, update, and delete:
The system must support set-at-a-time insert, update,
and delete operators. This means that data can be retrieved
from a relational database in sets constructed of data from multiple rows
and/or multiple tables. This rule states that insert, update, and delete
operations should be supported for any retrievable set rather than just for a
single row in a single table.
Rule 8: Physical data independence:
Changes to the physical level (how the data is stored,
whether in arrays or linked lists etc.) must not require a change to an
application based on the structure.
Rule 9: Logical data independence:
Rule 10: Integrity independence:
Integrity constraints must be specified separately from
application programs and stored in the catalog. It must be possible to
change such constraints as and when appropriate without unnecessarily affecting
existing applications.
Rule 11: Distribution independence:
The distribution of portions of the database to various
locations should be invisible to users of the database. Existing applications
should continue to operate successfully :
- when a
distributed version of the DBMS is first introduced; and
- when
existing distributed data are redistributed around the system.
Rule 12: The nonsubversion rule:
If the system provides a low-level (record-at-a-time)
interface, then that interface cannot be used to subvert the system, for
example, bypassing a relational security or integrity constraint.
This article taken from wiki : http://en.wikipedia.org/wiki/Codd's_12_rules
Monday, April 29, 2013
How to get notification when SQL Instance down
This article will help you to get an email alert when your SQL
instance down. For this implementation you need to additional instance for
monitoring purpose. Please have a look on the below diagram.

For this implementation, I am going to create one stored
procedure and one SQL Server job. The job will handle the all the action items
like connection to target instance, wait sometime re-connecting, occurring each
I minute time etc. Store procedure will send E-mail notification for given
email address or alias.
This stored procedure not mandatory and it is for additional
step to get notification by calling Stored Procedure. I will explain each step
First,
you need to configure E-mail in your monitor instance. To configure your E-mail
feature on SQL server please have look on this: http://dbamigos.blogspot.com/2013/04/database-mail-in-sql-server-2008.html
Second, you need to configure Linked Server for Target
Instance.
1.
Open SQL Server Management Studio , Expand
Server Object node in object Explorer , Right click on Linked Servers and Click
New Linked Server

2.
From below window, you need to select Type of
server as “SQL Server” and give the Server name with instance name.

3.
After that click security tab and select below
mention option and give SA login & credentials to connect to Target Instance.
Then click OK button

Third, I’m going to create SQL job
<!--[if !supportLists]--> 1.
In Object Explore, Expand SQL Server Agent Right click on job
and click new job
<!--[if !supportLists]--> 2.
<!--[endif]-->Give a name for your job. I gave name as
“InstanceMonitoring_I01”

4.
Give the step name as “Connect1” and give query
to execute on remote server. This simple query will execute on Target SQL
Server instance by using Linked Server that we configured previously. Purpose
of executing this simple query to get the Target Server instance is up and
running.
SELECT TOP 1 object_id
FROM [PEGASUSWIN7.SOL.NET\I01].master.sys.all_columns

5.
Go to the Advanced tab and select the “On
success action” and “On failure action” accordingly

On Success action:
Query execution successful. Target instance is up and running
On failure action: Query Execution Fail. Go to the next
step. This step will execute the delay query
6.
Create step 2, give Step name as “Delay1” and
give query as “WAITFOR DELAY '00:00:05'
“. This query will delay the execution for five second. This value you can change
by using this format “HH:MM:SS”

7.
Go to the Advanced tab and give “On success
action” and ‘On failure action” accordingly

On success Action: successfully delay the execution. Go to
the next step, will re-execute the query on Target SQL instance
On failure Action: failed to execute delay query quit the
job and report as a failure
8. Create another step – Connect2
Same as the step 4


9.
Create another delay step – Delay2


Whole purpose of these delay queries mean to wait
some amount of time ( 5 seconds) to re-execute the query. Because there may
have some network issues between Target Server and Monitor Server. (or any
other)
10.
Create another step-5, Connect3


There is no any other steps to execute after this step hence
I select “Quit the job reporting failure” as On failure action
Now we completed the steps creation part. Next we need to
schedule this job
11.
Select the Schedule tab and click New button

Give the details accordingly
I scheduled this job to run every day each 1 minute time

12.
Now you need to select the notification method
when job completes. For that you need to click Notification tab and select the
E-mail and select the Operator that you create previously

Now your job is successfully created. Then
try to test yourself by stopping Target Instance and you will get an E-mail
notification.
Additionally you can set another step to send
E-mail after failing Connect3 step. You need to crate store procedure on master
database (You can use any database) to send E-mail
1.
Create SP “InstanceMonitorI01_SendMail” in
Master database
USE master
GO
CREATE PROCEDURE
[dbo].[InstanceI01_SendMail]
AS
BEGIN
SET NOCOUNT ON
Exec msdb.dbo.sp_send_dbmail
@profile_name='DBMailProfile',
@recipients='hasithak@ecollege.com',
@copy_recipients='hasitha.kanchana@pearson.com',
@body='HASITHAKWIN7.MYCOMPANY.ORG\I01 Instance has failed',
@subject='HASITHAKWIN7.MYCOMPANY.ORG\I01 Instance failed';
END
2. Create additional step called “SendMail” after
Connect3 and give a command as
EXEC dbo.InstanceMonitorI01_SendMail

For Advanced tab,

3.
Now you need to modify step5 ( Connect3) because
we added separate step to send mail

On failure action: We move to next
step to send E-mail by executing step 6 ( SendMail)
Overall picture of the Job steps

Sunday, April 21, 2013
Database Mail in SQL Server 2008
Database mail was introduced in SQL Server 2005 and it was new feature in SQL Server 2005. Database mail is also available in SQL Server 2008 and 2012.The basic function of SQL Server 2008 Database Mail to send alert message to DBAs with issue related performance, disk space, SQL Jobs, Backup plans, and other changes in the database schema.
In SQL Server, there is another mail component which is called SQLMail. Database Mail is replacement of SQLMail and it is having more security than the SQLMail.
• Database Mail is based on SMTP ( Simple Mail Transfer Protocol)
• Database Mail depends on Service Broker and this service must be enabled
• Databse can be encrypt for additional security
• SQLMail is based on MAPI (Messaging Application Programming Interface)
• For SQLMail, to be enabled MAPI it will require Outlook to be installed
More and More efficient method is Database mail when compared with SQLMail.
This code block will help you to enable Database Mail,
sp_CONFIGURE 'show advanced', 1
GO
RECONFIGURE
GO
sp_CONFIGURE 'Database Mail XPs', 1
GO
RECONFIGURE
GO
Create Mail Profile and Account
Ø
First
you need to create profile. Profile is the main element of Database mail. One
profile may contain multiple email accounts. There are 2 types of Profile in
SQL Server,
o
Public
Profile - Can access by any user and
these user can send emails
o
Private
Profile – Need permission to send emails. This is for specific users
These are the Steps,
1. Connect to the SQL server
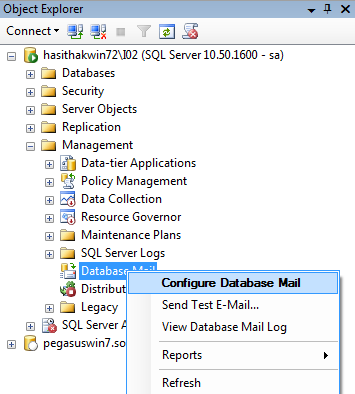
2. In Object Explore, Expand the Management Node and Right Click on Database Mail and click on Configure Database Mail
3. If
you are going to configure Database mail first time you may ask to enable
Database mail feature. If it is click yes. Form this window you need to select
“ Setup Database Mail by ….” And click Next

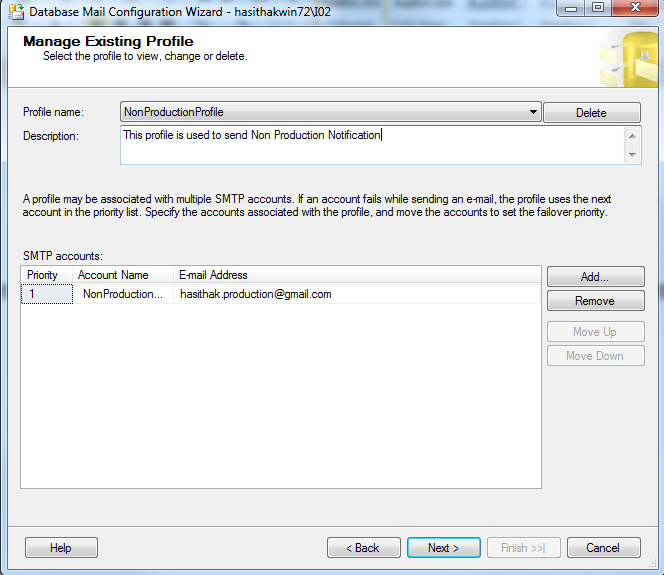
4. For this window, you need to give Profile Name and description for it.
Description is not a mandatory. This is the place you can
configure SMTP server. Click Add button

5. This
is place that your SMTP sever configuration need to place

Here, you can use your own mail server configuration. But if you
don’t have mail server you can configure with Gmail, Windows Live Mail, Yahoo
or any other global mail server provider.
For the demonstration purpose I used Gmail
server configuration.
Email address: Your Gmail e-mail ID
Display name: Whatever Name That You want
to Display with Your mail ( e.g Name)
Reply e-mail: Any reply-to email account
Server name: smtp.gmail.com
Port number: 587
This server requires a secure connection (SSL): Checked
ON
In the next section, choose Basic Authentication
and enter the following information:
User name: Your Gmail e-mail ID
Password: Password for your Gmail ID
Confirm password: Password for your
Gmail ID
This link will help you more on SMTP server: http://www.mssqltips.com/sqlservertip/2578/setup-sql-server-database-mail-to-use-a-gmail-hotmail-yahoo-or-aol-account/
Then Click OK button
Then Click Next
button to continue
6.
From This window you select you profile type ( Public or
Private) and set Default Profile as well

After configuring Profile type click
Next button
7. Here, You can configure the System Parameter and can specify prohibited attachment extensions

I didn't change other values and
click Next button
8. Finally You will get the confirmation window for Database Mail
Set up

Click Finish to complete the set up
and after set up complete click Close button
To Test Your Mail Configuration,
Go to the Object Explore, Expand the Management
Node, Right Click on Database Mail Click Set Test E-Mail

From This window you can sent Test e-mail
to your email account, for this you can use any email address

This window will help you to get
confirmation on the sent mail (No of sent mail may different)

Check you Inbox and you will see Test
mail from your SQL Server
Thursday, November 29, 2012
Does Clustered Index physically orders the data within a page?
I got new topic (for me) from our user group meeting
(17/10/2012). There was a question from Dinesh Priyankara (MVP), what
he asked from audience “Does Clustered Index physically order the data within
a page? “ Majority of the audience said 'yes' including myself. Then he said
it is another myth in SQL server world.
Then I came and searched on Internet and did small work to
break that myth. Here the truth..
“Clustered Index doesn't physically order the data within a page “
This is the script :
SET NOCOUNT ON
USE tempdb
GO
-- Create dbo.Without_Clustered_Index
table (Heap Table)
CREATE TABLE dbo.Without_Clustered_Index
(
ID int ,
Test varchar(10)
)
-- Create dbo.With_Clustered_Index table
CREATE TABLE dbo.With_Clustered_Index
(
ID int ,
Test varchar(10)
)
-- Create Unique Clustered index on
dbo.With_Clustered_Index
CREATE UNIQUE CLUSTERED INDEX UCI_With_Clustered_Index_ID_PK ON dbo.With_Clustered_Index
(
ID
)
-- Insert data into
dbo.Without_Clustered_Index table
INSERT INTO dbo.Without_Clustered_Index(ID,Test) VALUES ( 10 ,'Ten')
INSERT INTO dbo.Without_Clustered_Index(ID,Test) VALUES ( 8 ,'Eight')
INSERT INTO dbo.Without_Clustered_Index(ID,Test) VALUES ( 7 ,'Seven')
-- Insert data into
dbo.With_Clustered_Index table
INSERT INTO dbo.With_Clustered_Index(ID,Test) VALUES ( 10 ,'Ten')
INSERT INTO dbo.With_Clustered_Index(ID,Test) VALUES ( 8 ,'Eight')
INSERT INTO dbo.With_Clustered_Index(ID,Test) VALUES ( 7 ,'Seven')
SELECT ID,Test
FROM dbo.Without_Clustered_Index
SELECT ID,Test
FROM dbo.With_Clustered_Index
-- Set to instruct the engine to send
output to the console;
DBCC TraceOn (3604)
GO
-- List all of a table's data and index
pages
DBCC IND ('TempDB','dbo.Without_Clustered_Index',1)
GO
DBCC IND ('TempDB','dbo.With_Clustered_Index',1)
GO
-- 288 and 290 are the data page ID for dbo.Without_Clustered_Index and dbo.With_Clustered_Index tables respectively
-- Look at the contents of database
pages
DBCC PAGE ('TempDB',1,288,2) --with tableresults
GO
DBCC PAGE ('TempDB',1,290,2) --with tableresults
GO
-- Insert data into
dbo.Without_Clustered_Index table
INSERT INTO dbo.Without_Clustered_Index(ID,Test) VALUES ( 4 ,'Four')
INSERT INTO dbo.Without_Clustered_Index(ID,Test) VALUES ( 3 ,'Three')
-- Insert data into
dbo.With_Clustered_Index table
INSERT INTO dbo.With_Clustered_Index(ID,Test) VALUES ( 4 ,'Four')
INSERT INTO dbo.With_Clustered_Index(ID,Test) VALUES ( 3 ,'Three')
-- Look at the contents of database
pages
DBCC PAGE ('TempDB',1,288,2) --with tableresults
GO


DBCC PAGE ('TempDB',1,290,2) --with tableresults
GO


-- Update Existing Record from each
record
UPDATE dbo.Without_Clustered_Index
SET ID = 1 WHERE ID = 4
UPDATE dbo.With_Clustered_Index
SET ID = 1 WHERE ID = 4
-- Look at the contents of database
pages
DBCC PAGE ('TempDB',1,288,2) --with tableresults
GO


DBCC PAGE ('TempDB',1,290,2) --with tableresults
GO


Conclusion :
In Row offset, 0th entry value changed into new record distance
value (173 to 193) and 1st
entry value changed into 173 by removing 154 (154 is the distance value
of the ID = 4 value record). We updated ID = 4 into ID= 1
Instead of modifying existing record it adds new record with
same value by updating required value.
Subscribe to:
Posts (Atom)